初读 Pro Git
一些需要弄明白的名词:commit range/refspec。
git 基础
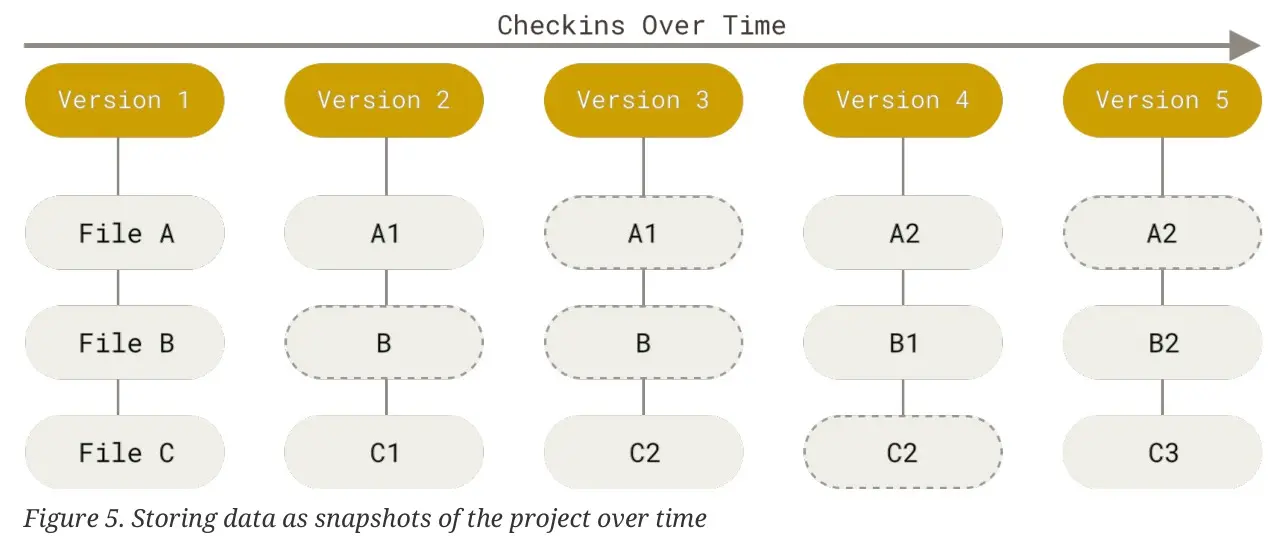
git 的管理方式是记录每个文件的快照。
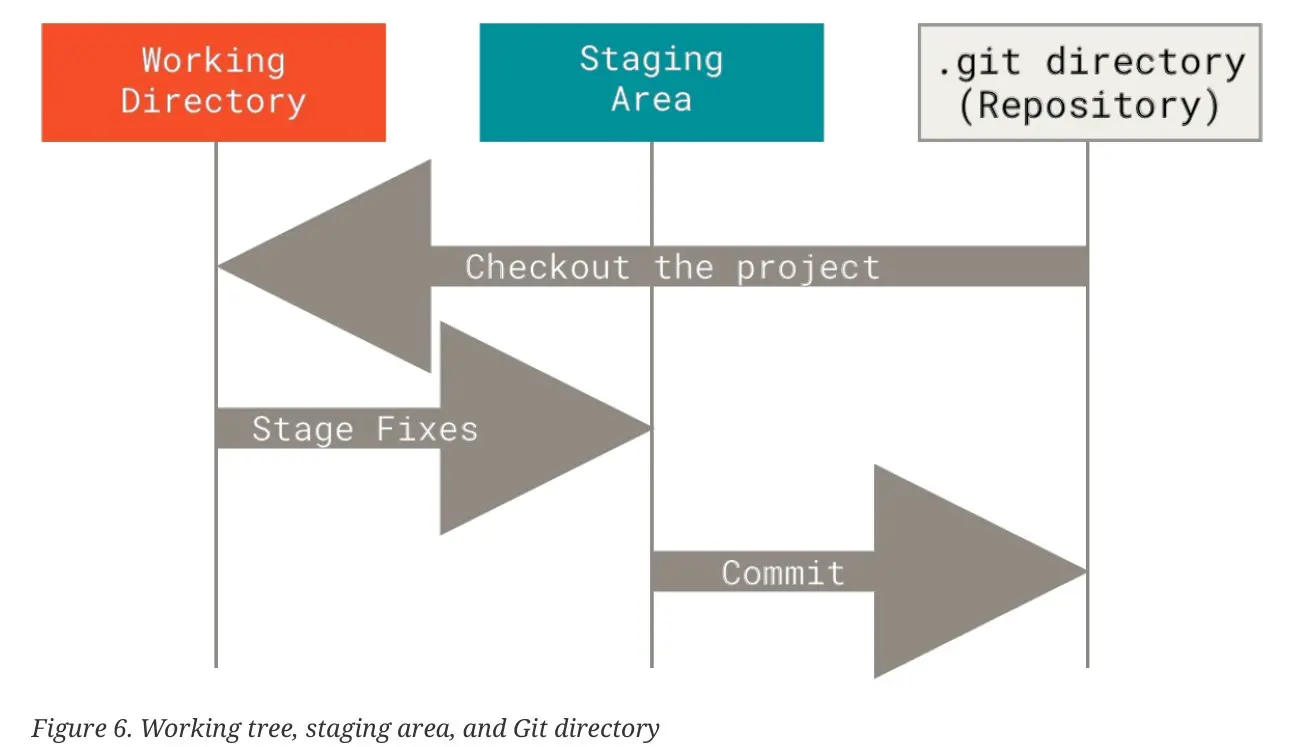
然后分成三个区:
git add
如果一个文件改动了多个地方,但是只想要提交其中的部分行,可以用 git add --patch。这样 git 会启动一个交互式的程序,并询问用户每个 chunk 是否要加入。这种交互式环境提供多种操作,其中 e 操作允许用户使用编辑器精准编辑要添加的修改。
git status
git status 可以显示当前工作区的状态。添加 -s 选项,即 git status -s,可以显示更简单(摘要)的状态(很像 VS Code 边栏上的信息):
$ git status -s
?? .cache/
?? .clang-tidy
?? utils/clang-tidy.py
输出的有些文件签名是双问号,表示 untracked。
git rm
关于 git rm --cached 和 git restore --staged 的区别(https://stackoverflow.com/a/65434709/):
git rm --cached file: removes the copy of the file from the index / staging-area, without touching the working tree copy. The proposed next commit now lacks the file. If the current commit has the file, and you do in fact make a next commit at this point, the difference between the previous commit and the new commit is that the file is gone.
git restore --staged file: Git copies the file from the HEAD commit into the index, without touching the working tree copy. The index copy and the HEAD copy now match, whether or not they matched before. A new commit made now will have the same copy of the file as the current commit.If the current commit lacks the file, this has the effect of removing the file from the index. So in this case it does the same thing as
git rm --cached.
git reset file: this copies the HEAD version of the file to the index, just likegit restore --staged file.
注意转义星号(git 本身和部分 shell 会解释星号),比如git rm log/\*.log。
git log
git log -p -2(也可以写成 --patch)能够在显示日志的时候同时显示改动的内容(相当于同时做了 diff),然后 -2 限制了只显示最开头的两个 commits(这个选项和 -p 是正交的)。
git log --stat 会在 log 中显示每个 commit 的 summary。
$ git log --pretty=oneline
ca82a6dff817ec66f44342007202690a93763949 Change version number
085bb3bcb608e1e8451d4b2432f8ecbe6306e7e7 Remove unnecessary test
a11bef06a3f659402fe7563abf99ad00de2209e6 Initial commit
--pretty=oneline 会显示完整的 hash,而 --oneline 只显示前 7 个字符(--pretty=oneline --abbrev-commit)。
$ git log --pretty=format:"%h - %an, %ar : %s"
ca82a6d - Scott Chacon, 6 years ago : Change version number
085bb3b - Scott Chacon, 6 years ago : Remove unnecessary test
a11bef0 - Scott Chacon, 6 years ago : Initial commit
-S 表示搜索,这会过滤整个仓库的 commits(如果仓库很大可能有点慢)并显示所有让给定的字符串的出现次数改变的 commits。
$ git log -S narrow_cast
commit 287fd454cdaca7bf65b0be8e91c730ebeb6bdecd (HEAD -> types, origin/xx/types)
Author: AA BB <user@email.com>
Date:   Thu Nov 16 21:28:44 2023 +0800

    feat: narrow_cast and sign_cast
显示让特定文件改变的那些提交:
git log -- path/to/file
显示特定 commit 的日志(而不是 HEAD):
git log master
git tag
$ git tag
v1.0
v2.0
$ git tag -l "v1.8.5*"
v1.8.5
v1.8.5-rc0
v1.8.5-rc1
v1.8.5-rc2
v1.8.5-rc3
git 支持两种 tag:lightweight 和 annotated。创建有注释的 tag 可以用于发布,这些信息会详细地存储在 repo 中:
git tag -a v1.4 -m "my version 1.4"
-m 和 git commit 的 -m 选项类似,如果不给就会弹出默认的编辑器。
如果不加 -a 选项,就会创建一个简单的 tag,就像一个不用更新的 branch 一样。这样的 tag 适合临时使用。
$ git tag v1.4-lw
$ git show v1.4-lw
commit ca82a6dff817ec66f44342007202690a93763949
Author: Scott Chacon <schacon@gee-mail.com>
Date: Mon Mar 17 21:52:11 2008 -0700
Change version number
给除了 HEAD 以外的 commit 加 tag 的例子(需要多加一个参数):
git tag -a v1.2 9fceb02
By default, the git push command doesn’t transfer tags to remote servers.
git push origin <tagname> 能够把本地的 tag 推送到远程主机。
git push origin --tags 会将本地的所有 tags(包括 lightweight 和 annotated)推送的远程主机。
git push origin --follow-tags 会将本地的所有 annotated tags 推送的远程主机。
Note
在我阅读 Pro Git 这本书的时候,还没有只推送 lightweight tags 的选项。
删除一个本地的 tag:
git tag -d v1.4-lw
删除一个远程的 tag:
git push origin :refs/tags/v1.4-lw
也可以用 git push origin --delete <tagname> 达到同样的效果。
git checkout/branch
git checkout -b newBranch <commit> 可以从给定的 commit 分叉出一个新分支。这里的 commit 还可以用 branch 或者 tag。这样就不必先 checkout 到给定的分支再创建新的了(两步合成一步)。
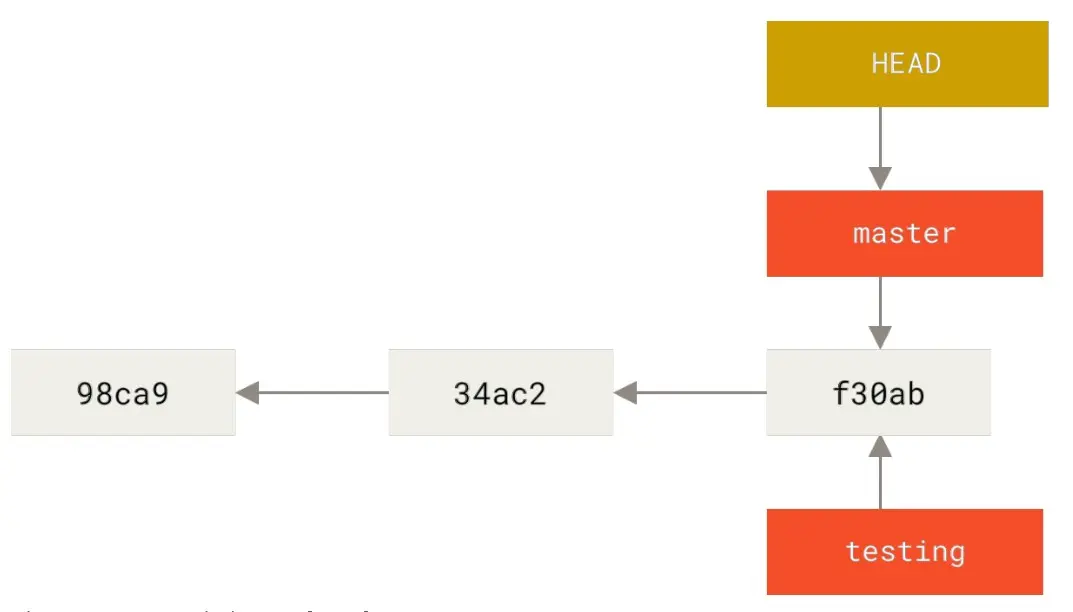
git 的有向无环图结构存储的是 parent 指针(可能有多个),而不是 children 指针。每个分支、tag 都包含了这样的指针。
创建新的分支但是不 checkout:
git branch testing
git log --decorate 会在日志中展示每个 commit 和哪些分支关联,相当于 git log --decorate=short。旧 git 不会自动 decorate,而新版已经默认开启了 --decorate=auto。
创建并转移到新的分支:
git checkout -b branchA
# or
git switch -c branchA
# -c is the same as --create
git 的 hash 全长是 40 个字符,但是简写是 7 个字符。在 unmerged files 里面留的标记也是连续 7 个 <、=、>。
git branch -v 能显示分支和各分支最近一次的提交。git branch -vv 会比 -v 多显示本地分支和远程分支的 track 关系:
$ git branch -vv
iss53 7e424c3 [origin/iss53: ahead 2] Add forgotten brackets
master 1ae2a45 [origin/master] Deploy index fix
- serverfix f8674d9 [teamone/server-fix-good: ahead 3, behind 1] This should do it
testing 5ea463a Try something new
The useful
--mergedand--no-mergedoptions can filter this list to branches that you have or have not yet merged into the branch you’re currently on.
git branch         # 显示本地分支
git branch -r      # 显示远程分支
git branch --all   # 显示本地和远程分支
在克隆的时候可以指定远程主机的命名(否则是 origin),比如git clone -o booyah
$ git push origin serverfix
Counting objects: 24, done.
Delta compression using up to 8 threads.
Compressing objects: 100% (15/15), done.
Writing objects: 100% (24/24), 1.91 KiB | 0 bytes/s, done.
Total 24 (delta 2), reused 0 (delta 0)
To https://github.com/schacon/simplegit
- [new branch] serverfix -> serverfix
Git automatically expands the serverfix branch name out to
refs/heads/serverfix:refs/heads/serverfix.
三种 track 远程分支的方式
从给定的分支 checkout 出新分支:
$ git checkout -b sf origin/serverfix
Branch sf set up to track remote branch serverfix from origin.
Switched to a new branch 'sf'
同时,由于 checkout 到的新分支是基于远程分支的,会自动 track!
track 一个远程分支的另外一种写法(本地的分支名也是 serverfix):
git checkout --track origin/serverfix
这条命令并不是让当前分支去 track 远程分支,而是创建一个同名分支并 track 远程分支。相当于 git checkout -b severfix origin/serverfix。
如果 checkout 的分支不存在,而且又恰好有对应的远程分支,可以不加选项地使用 checkout:
$ git checkout serverfix
Branch serverfix set up to track remote branch serverfix from origin.
Switched to a new branch 'serverfix'
要让当前分支去 track 给定的远程分支,可以用 git branch -u:
$ git branch -u origin/serverfix
Branch serverfix set up to track remote branch serverfix from origin.
如果本地分支 track 了远程分支,用 @{u} 或者 @{upstream} 可以代表对应的远程分支。这样在 git merge 等场景会比较方便。
git rebase
git rebase 可以用来将分支上的 commits 线性添加到另外一个分支上。
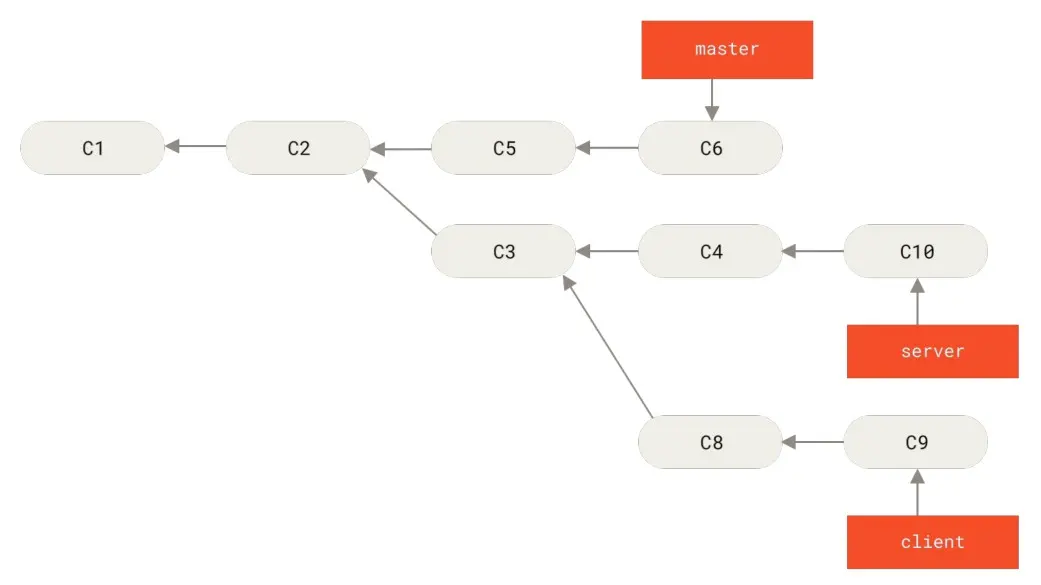
在这个例子中,如果想要让 client 的改动放到 master 上,但是不想要 server 的改动也就是 C3 也移动过去,就需要用到 rebase。
git rebase --onto master server client
# 同 git rebase --onto master "$(git merge-base server client)" client
上面的命令指定要前往的新分支是 master。而从 server 到 client 是要挑选的 commits 范围。git rebase 会从考虑两个分支的祖先(不包含)到第二个分支(包含)之间的改动。
git on the server
四种传输协议
git 支持四种协议:local/http/ssh/git。
local 可以是 file:// 开头的 url,也可以是本地路径。前者会使用本地网络拷贝,速度较慢。后者会使用硬链接或者直接拷贝文件,速度快但是不如前者干净(比如刚从 svn 转移过来时有不少冗余分支)。
/tmp/git-remote $ git remote add origin /root/proj/.git
/tmp/git-remote $ git fetch origin
remote: Enumerating objects: 15548, done.
remote: Counting objects: 100% (15548/15548), done.
remote: Compressing objects: 100% (5231/5231), done.
...
本地协议的终点必须是一个 bare repository,也就是 .git 文件夹,而不包含工作区文件。事实上,远程仓库没有工作区,因为没有人会在远程仓库直接工作。
用 NFS 搭建的远程访问上的 file:// 协议往往速度比 ssh 要慢。所以除非是可以本地访问(一台大服务器上的多个 docker 容器使用了路径映射),但不建议这种方式。(放在同一台服务器上也不安全吧?)
git 用的 http 协议分成 smart http 和 dumb http。前者(现在一般使用的是这个)通过 http 协议支持各种功能,后者只能作为一个简单的 http 服务器 serve 裸仓库。裸仓库克隆之后不会自动设置一些信息,比如 objects/info/packs 和 info/refs。
$ cd /var/www/htdocs/
$ git clone --bare /path/to/git_project gitproject.git
$ cd gitproject.git
$ mv hooks/post-update.sample hooks/post-update
$ chmod a+x hooks/post-update
ssh 协议可以不用加 ssh:// 前缀(也可以加):
git clone user@git.example.com:/srv/git/my_project.git
Finally, we have the Git protocol. This is a special daemon that comes packaged with Git; it listens on a dedicated port (9418) that provides a service similar to the SSH protocol, but with absolutely no authentication or cryptography.
git 协议还需要创建 git-daemon-export-ok 文件。git 协议是所有人都有权限,不需要认证,所以一般大家只开放 pull 而不开放 push。git 协议是所有协议中最快的,它使用了和 ssh 相同的数据传输协议,但是没有加密传输的开销。另一方面,由于 git 协议不加密,所以 pull 下来的代码可能是不安全的(比如中间人攻击插入恶意代码)。而 https 和 ssh 都是有加密的。
git 协议需要自己的 daemon,所以搭建起来也不是很容易。
Bare Repository
在 git init 和 git clone 的时候都能指定 --bare 选项表示裸仓库。
Git will automatically add group write permissions to a repository properly if you run the git init command with the –shared option.
ssh user@git.example.com
cd /srv/git/my_project.git
git init --bare --shared
在书里的例子中,/srv/git/my_project.git 本来就是一个裸仓库,所以第三句的含义是将裸仓库初始化成共享仓库。也就是让仓库目录的归属组都有写权限,否则只有仓库目录的归属用户有写权限。(在个人电脑上,归属组和归属用户可能是重名的。)
裸仓库是直接将正常仓库中的 .git 里的内容写到给定的路径里的,没有 working tree。
ssh 和 git-shell
如果安装了 git-shell,可以创建一个名为 git 的用户(只是建议,git 不是特殊的名字)然后改变其登陆 shell:
sudo chsh git -s $(which git-shell)
用户直接登陆通过 ssh 协议 serve 有仓库的服务器时使用 git-shell 的好处是管理者可以给 git-shell 加一些限制规则,从而限制用户可以执行的命令。(现在不会有人用这个吧?)
其他搭建方式
Git daemon/http/GitWeb/Gitlab 等,略。
书中讲的 gitlab 不是搭建 gitlab 容器,而是将项目上传到 gitlab 上,讲的比较浅不用看。
Distributed Git
Workflow
这里讲了两种:
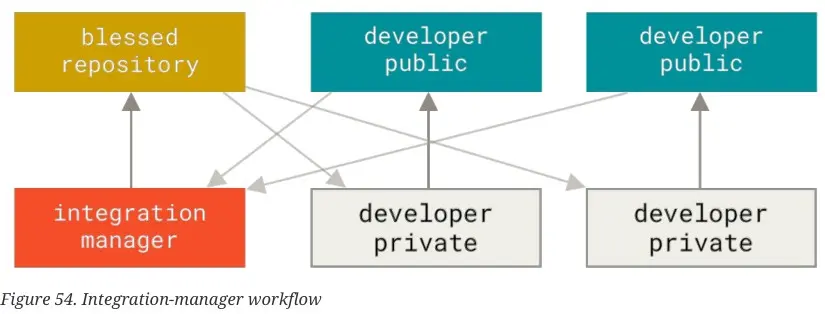
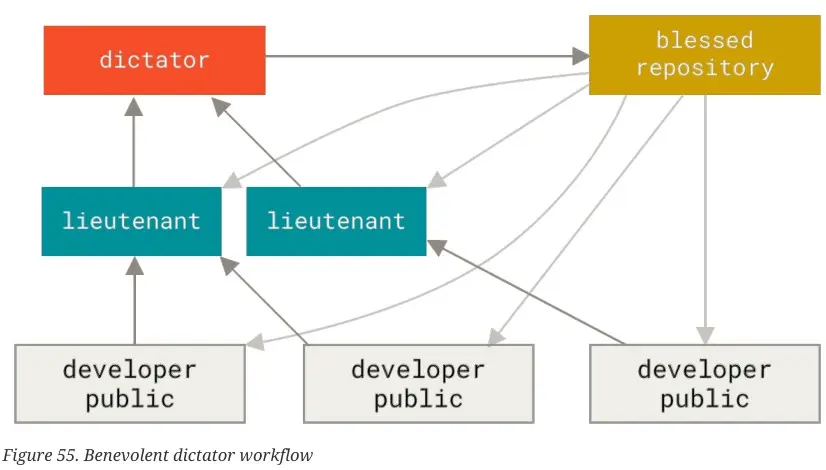 (仁慈的独裁者)
检查改动是否有格式问题
git diff --check 能够检查此次改动中:
- 空白字符相关的格式问题:文件每一行的末尾是否有多余的空白字符、文件的末尾是否有两个空行(只有一个空行是可以的)等。
- 是否有 conflict markers(合并或 rebase 还没有处理完成)。
在提交前可以跑一下 git diff –cached –check。
50/72 规则
git commit 信息中标题建议不要超过 50 个字符,正文信息每行不要超过 72 字符。
Workflow: private small team
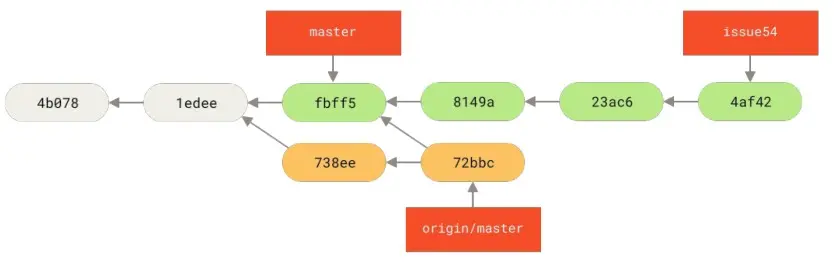
假设想要看看 origin/master 比本地的 issue54 多了哪些修改:
$ git log --no-merges issue54..origin/master
commit 738ee872852dfaa9d6634e0dea7a324040193016
Author: John Smith <jsmith@example.com>
Date: Fri May 29 16:01:27 2009 -0700
Remove invalid default value
其中 --no-merges 选项表示不显示 merge 结点(也就是 parents 数量超过 1 个的结点),在这里是 origin/master 本身。只是由于用户在运行其他命令之前看不到读者在书中相应位置能看到的图,所以不知道远程到底有没有 merge 结点(毕竟如果知道则可以根据图手动把这个 commit 划入范围之外)。
The issue54..origin/master syntax is a log filter that asks Git to display only those commits that are on the latter branch (in this case origin/master) and that are not on the first branch.
Workflow: private managed team
除非要删除开发分支,最好不要在合并的时候 squash。因为 squash 合并后只有一个 parent,开发者之后的改动又会需要 rebase!
git merge --no-commit 是指不要创建描述本次合并的 merge commit 结点,但是仍然可能 fast-forward。git merge --no-commit --no-ff 还会禁用 fast-forward。这两个选项都打开就能达到检查合并结果,但是暂不合并的效果。(比如想要测试是否能够成功合并,或者想在合并之前检查一下合并结果再 commit。)
使用邮件工作:diff 和 patch
diff 和 patch 两个命令本身就在 Linux 中存在(前者生成 patch,后者应用 patch)。但如果可能,使用 git format-patch 和 git am,而不是直接使用这两个命令。
git format-patch 可以生成 patches。
不要用
git diff master来生成 patch,因为git diff master只是简单比较文件的变化情况,如果你的 master 分支并不是 topic 分支的 parent(在 branch 之后已经向前移动了),那么 diff 中会出现有删有增的变化!这个时候应该用 commit range 的两点表示法,否则 patch 之后 master 的新改动会丢失。
git apply 可以应用一般的 diff,但是和 patch 命令相比具有原子性,要么全部成功,要么全部失败。git apply --check 可以用来检查本次 apply 是否能够成功,但是不会真的 apply。
git am 是对 git apply 的包装,能够对 mbox 格式的文件处理。mbox 是一系列 diff 文件拼接到一起作为邮件正文传输的一种格式。
两点式和三点式的 commit range
注意!不适用于 git diff!更多见 Commit 表示法。
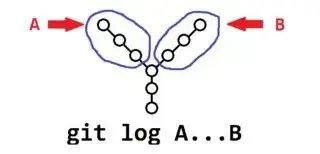 三点式:出现在 A 但不出现于 B,或者相反。
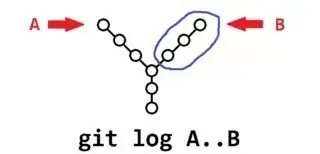 两点式:出现在 B 中,但不出现在 A 中。
git log contrib --not master 和 git log master..contrib 效果是一样的。
在 git 中包含密钥
可能现在不会用到了。这种导入密钥的方式只会在 git 仓库的 objects 中包含一个文件,并不会让文件出现在工作区。
导出密钥,并将密钥写入到仓库的 objects 中。
$ gpg -a --export F721C45A | git hash-object -w --stdin
659ef797d181633c87ec71ac3f9ba29fe5775b92
然后给 objects 一个 tag,防止 gc 的时候丢失(同时也能方便查找)。
git tag -a maintainer-pgp-pub 659ef797d181633c87ec71ac3f9ba29fe5775b92
给完 tag 之后后续别人可以通过 tag 找到 hash,然后找到文件并导入:
git show maintainer-pgp-pub | gpg --import
举个例子,我现在在 darknet 的仓库中(手头有个仓库,顺便打开了):
$ git ls-tree master
100644 blob bea19ff44fcb77ccca5448e730bd154327088a30    .gitignore
100644 blob a50f7d700ba02bfacd50f59b315311cf4d0bbda2    LICENSE
100644 blob 8b1a9d8189b3b9f4479221d52882ce36fdc73a62    LICENSE.fuck
100644 blob c54113271e15057c4def6676693eb96fd6362b28    LICENSE.gen
100644 blob 9cecc1d4669ee8af2ca727a5d8cde10cd8b2d7cc    LICENSE.gpl
100644 blob 6728bd28d319c68ae04944fb034118dcc4c9aa09    LICENSE.meta
100644 blob 5bd806ce16ea5053c8631793787362439375026e    LICENSE.mit
100644 blob 5b8709acc43e7b76ed69758a52a9eaffaba775e6    LICENSE.v1
100644 blob 63e15e657fa3e47455598beaf8f27df4386f5a9e    Makefile
100644 blob fb58c2640038a963cd573d121e4fab59399f67dc    README.md
040000 tree b789d4e25fb76862394c3805d2a529d49c353ae9    cfg
040000 tree 7751b6063e5b86ef67fd155b2d4496c5c85d4516    data
040000 tree da080efd69a73cdfd765b1785e0df5fcee769a52    examples
040000 tree 87a27ca1a74b281df2301d41b7a5b359c5322335    include
040000 tree 5cf5ca862a8e43ac9276a84c7187680d32754aa0    python
040000 tree f5c65d4da6faf9f382a28a7f766d1c2247453150    scripts
040000 tree e4da33bf1850bf3c6eab30232e299acddf672b62    src
使用 git show {hash},如果 hash 对应某个 blob,将直接展示快照的内容。
$ git show a50f7d700ba02bfacd50f59b315311cf4d0bbda2
                                  YOLO LICENSE
                             Version 2, July 29 2016

THIS SOFTWARE LICENSE IS PROVIDED "ALL CAPS" SO THAT YOU KNOW IT IS SUPER
SERIOUS AND YOU DON'T MESS AROUND WITH COPYRIGHT LAW BECAUSE YOU WILL GET IN
TROUBLE HERE ARE SOME OTHER BUZZWORDS COMMONLY IN THESE THINGS WARRANTIES
LIABILITY CONTRACT TORT LIABLE CLAIMS RESTRICTION MERCHANTABILITY. NOW HERE'S
THE REAL LICENSE:

0. Darknet is public domain.
1. Do whatever you want with it.
2. Stop emailing me about it!
如果 hash 对应一个 tree,会列举文件夹:
$ git show 7751b6063e5b86ef67fd155b2d4496c5c85d4516
tree 7751b6063e5b86ef67fd155b2d4496c5c85d4516

9k.labels
9k.names
9k.tree
coco.names
coco9k.map
dog.jpg
eagle.jpg
giraffe.jpg
goal.txt
horses.jpg
imagenet.labels.list
imagenet.shortnames.list
inet9k.map
kite.jpg
labels/
openimages.names
person.jpg
scream.jpg
voc.names
如果 hash 对应一个 commit,对显示 commit 的日志。
为 commit 创建可读的名称
$ git describe master
v1.6.2-rc1-20-g8c5b85c
########## ^^  ^^^^^^^
#      /    |     \
# last tag  |   partial sha1
#           |
#   commits since the tag
In response, Git generates a string consisting of the name of the most recent tag earlier than that commit, followed by the number of commits since that tag, followed finally by a partial SHA-1 value of the commit being described (prefixed with the letter “g” meaning Git).
但是必须得让 git 先找到对应分支上最近的 tag,才能用 describe。也就是说无 tag 的时候是不能 describe 的,会报错。
默认情况下,git describe 描述的 tags 的只能是 annotated tags。可以加 –tags 来描述无注释的 tags。
创建 archive
git archive master --prefix='project/' --format=zip > `git describe master`.zip
如果没有 --format 选项,则会采用 tar.gz。
Shortlog
git shortlog 能够展示选定范围内的所有改动,而且是按作者分组的,概览起来比较方便。主要用途是阅读一段时间内不同人员对仓库做出的贡献。
$ git shortlog --no-merges master --not v1.0.1
Chris Wanstrath (6):
    Add support for annotated tags to Grit::Tag
    Add packed-refs annotated tag support.
    Add Grit::Commit#to_patch
    Update version and History.txt
    Remove stray `puts`
    Make ls_tree ignore nils
Tom Preston-Werner (4):
    fix dates in history
    dynamic version method
    Version bump to 1.0.2
    Regenerated gemspec for version 1.0.2
Github
这一章基本可以跳过,但是还是有一些新的知识点。
git diff --word-diff 可以用来按照词显示差异。
$ git diff --word-diff
diff --git a/blink.ino b/blink.ino
index 15b9911..a6cc5a5 100644
--- a/blink.ino
+++ b/blink.ino
@@ -18,7 +18,7 @@ void setup() {
// the loop routine runs over and over again forever:
void loop() {
digitalWrite(led, HIGH); // turn the LED on (HIGH is the voltage level)
[-delay(1000);-]{+delay(3000);+} // wait for a second
digitalWrite(led, LOW); // turn the LED off by making the voltage LOW
[-delay(1000);-]{+delay(3000);+} // wait for a second
}
这是 Gitlab-flavored markdown 支持的。Github 可能也支持?
The other interesting URLs are the .diff and .patch URLs, which as you may guess, provide unified diff and patch versions of the Pull Request. You could technically merge in the Pull Request work with something like this:
$ curl https://github.com/tonychacon/fade/pull/1.patch | git am
这样能够直接从 gitlab 的 url 上面下载新的东西 patch 并应用。gitlab 也支持。
在 merge-request 或者 pull 页面加上后缀:
.diff后缀:相当于运行 git diff,改动按照文件分类。.patch后缀:相当于运行 git format-patch,改动先按照 commit 分类再按照文件分类。
另一方面,在原来使用主机的地方,可以直接使用 url,主要是用于临时下载(不想要保存主机再删除的情况)。
Git Tools
git reflog
git reflog 能够显示过去一段时间对 HEAD 的操作信息,记录了当前的分支是怎么改动的。比如什么时候发生了 reset 或者 checkout。reflog 信息是完全本地的。
Think of the reflog as Git’s version of shell history.
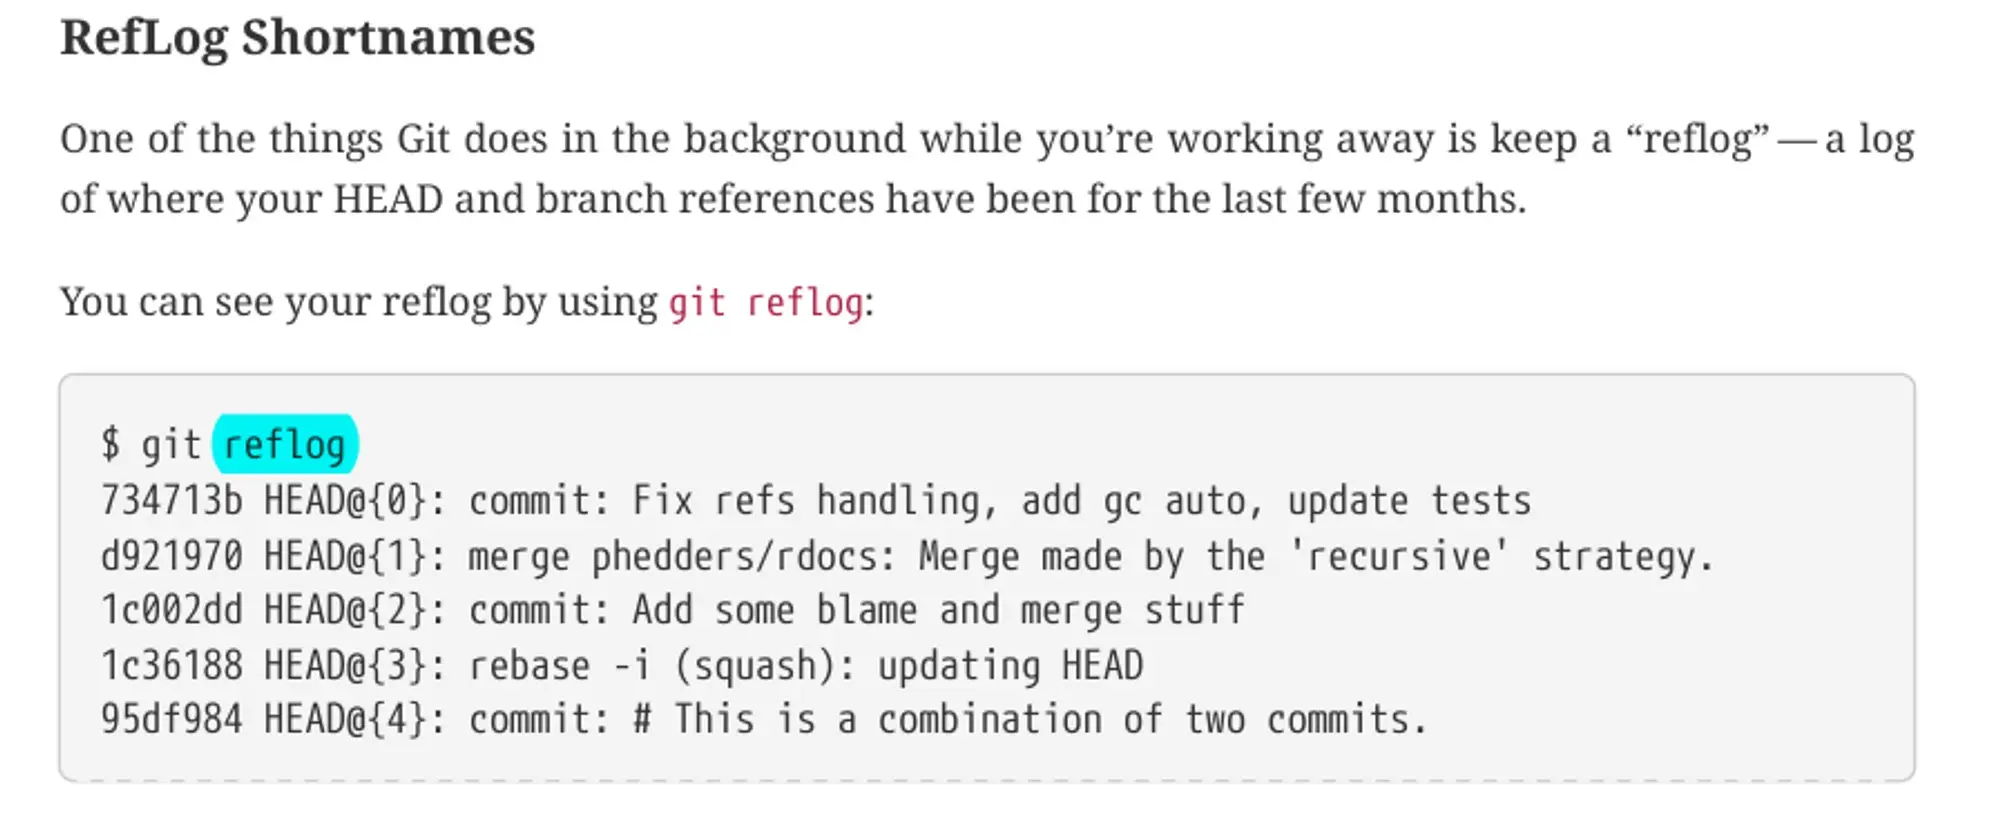
这些信息对于最终的代码没用,但是对于工作可能很有帮助。比如先查到 git reflog 信息之后可以这样指代一个 commit:
git show HEAD@{5}
# or
git show master@{yesterday}
# or
git show HEAD@{2.months.ago}
使用 git log -g 可以在 log 中显示 reflog 信息。
Escaping braces in PowerShell
When using PowerShell, braces like { and } are special characters and must be escaped. You can escape them with a backtick ` or put the commit reference in quotes:
$ git show HEAD@{0}   # will NOT work
$ git show HEAD@`{0`} # OK
$ git show "HEAD@{0}" # OK
这也是为什么我不喜欢 PowerShell。
{commit}^
^ 表示 parent。注意 Windows 的 cmd 上要用 ^^,因为 cmd 对 ^ 有转义。
Commit 表示法
You can get the same results as in the previous example by typing
git log origin/master..— Git substitutes HEAD if one side is missing.
如果 range 的一端被省略,则 git 会用 HEAD 代替。
也可以多点表示。以下三种写法含义相同:
$ git log refA..refB
$ git log ^refA refB
$ git log refB --not refA
其中 ^refA 就表示 --not refA。这种写法比起 两点和三点表示法 可以支持更多的分支。比如:
$ git log refA refB ^refC
$ git log refA refB --not refC
注意!这不适用于 git diff!git diff 仅能比较两个提交,而且有历史性的、不满足 commit 表示法的实现需要兼容。
- 如果包含
--not或^,先转换成两点表示法,再进行下一步。 - 如果是两点表示法,去掉
..相当于直接比较两个端点(endpoint)。 - 如果是三点表示法,则先找到两个端点的 merge-base,再比较 merge-base 和第二个端点。
git diff [<options>] <commit>..<commit> [--] [<path>…]This is synonymous to the earlier form (without the..) for viewing the changes between two arbitrary<commit>. If<commit>on one side is omitted, it will have the same effect as using HEAD instead.
git diff [<options>] <commit>...<commit> [--] [<path>…]This form is to view the changes on the branch containing and up to the second<commit>, starting at a common ancestor of both<commit>.git diff A...Bis equivalent togit diff $(git merge-base A B) B. You can omit any one of<commit>, which has the same effect as using HEAD instead.
因为历史遗留问题,看上去 git diff 的两点表示法和三点表示法和其他命令是相反的!
git log 使用三点表示法(被给定的某一个分支包含,却不是同时包含的那些 commits)的时候还可以加上 –left-right 参数:
$ git log --left-right master...experiment
< F
< E
> D
> C
这样能看到 commit 是来自左边还是右边。
git add -i
 一些命令:
一些命令:
- revert 可以撤掉对一个文件的更新,相当于
git restore --staged -- {file}。 - update 可以整体添加文件。
- patch 可以添加文件的一个部分。在 patch 模式中使用 e 选项可以编辑 chunk,但只是会修改要暂存的内容(index),这里编辑的内容并不会影响工作区。从
git add -p也可以直接进入这一步。
其他说明:
git reset、git stash save和git checkout也都能加-p选项!- git stash save(deprecated)现在被 git stash push 替代。
- VS Code 也有按照选区添加内容的方式。
git stash
git stash list 之后选择要应用的 stash:
git stash apply stash@{2}
这个格式是不是很熟悉?这是 reflog 的格式,这也同样表明 git stash 的内容是完全本地,不会被提交到远程仓库的!git stash 内容如果丢失将无法恢复。
在 stash 的时候忽略 index 区:
$ git stash --keep-index
Saved working directory and index state WIP on master: 1b65b17 added the index file
HEAD is now at 1b65b17 added the index file
Stash 未追踪的内容可以用 --include-untracked or -u,但是这不会 stash 写在 .gitignore 中的内容。使用 --all 或者 -a 能将 .gitignore 中的内容也 stash。
git stash --patch:将部分文件内容加入 stash。
git stash branch <new branchname>:创建 stash,checkout -b 到新分支,再 apply stash。在工作区产生了别的改动内容时有用。
git clean
git clean 用来移除 untracked 文件。(作为对比,git reset 是重置 tracked 文件。)
如果不放心,可以先 --dry-run 或者 -n 一下。
一些选项:-f 强制删除,-ff 在强制删除不可行的时候强调强制删除。-i 交互式删除,-d 删除文件夹(否则会忽略文件夹),-x 忽略 .gitignore 文件。
git clean 相对来说不是很安全,也可以考虑 git stash -a 作为替代。
gpg 签名
可以用 gpg 签名一个 tag 或者 commit,这样其他人就能验证提交者的身份。在 git 配置文件中设置 commit.gpgsign 为 true 会默认启用签名。
其他的包括创建密钥、导出、验证、在 tag 或 commit 的时候签名的内容就此省略。
git grep
git grep 只会搜 git 知道的文件,所以速度比 grep 更快(前提是你要找的内容就在 git 中)!
默认搜索范围是整个工作区。
-n 或者 --line-number 可以让输出结果附加行号(默认的输出只有文件名和内容行)。
感觉和可视化界面相比不是很好用。
git log -S 搜索字符串变化情况。
git log -L 可以搜索行历史。-L argument 可以是 ‘start,end:file’ or ‘:funcname:file’。搜索 funcname 可能搜索不到,比如 python 文件中类的成员函数。也可以用正则表达式指定函数的开始和结束,比如:
git log -L '/unsigned long git_deflate_bound/',/^}/:zlib.c
这样就能搜到:
@@ -81,0 +85,5 @@
+unsigned long git_deflate_bound(z_streamp strm, unsigned long size)
+{
+ return deflateBound(strm, size);
+}
+
git commit –amend
如果不需要为 git commit --amend 提供信息,可以用 git commit --amend --no-edit。
git rebase -i
可以 squash commits、修改 commits 的提交信息、交换 commits 的顺序、将一个 commit 分裂成多个。
git rebase -i 的 edit 选项
其中 edit 选项能够编辑过去的一个 commit(可以 reword、选择提交的文件、分多次提交等等)。怎么做呢?
给某个 commit 选择 edit,git-rebase 就会在这个地方停下来。我们可以按照自己的意愿进行提交,然后使用 git rebase --continue 让 git 继续 rebase。后续的 commits 就像用 cherrypick 选出来的一样(正如 cherrypick,被编辑的 commit 之后的所有 commit 的 hash 都会变)。
如果这个时候直接使用 git rebase --continue,那就相当于没有编辑这个 commit。如果想要编辑则需要先 reset:
$ git reset HEAD^
$ git add README
$ git commit -m 'Update README formatting'
$ git add lib/simplegit.rb
$ git commit -m 'Add blame'
$ git rebase --continue
这样这条 commit 就变成了两条。在使用 git rebase --continue 之后,后面的命令会接上来。
用 git rebase –abort 可以取消之前的 rebase。
fixup 功能: 当你发现了之前 commit 的一个小错误,想要将小错误修补回去时,可以先将这个小错误的修复提交,然后用 rebase -i 来重组提交。将该修复移动到之前提交的下方,然后选择 fixup。
也有更方便的方式(主要是难记):
$ git add {filename...}                 # Stage a fix
$ git commit --fixup=a0b1c2d3           # Perform the commit to fix broken a0b1c2d3
$ git rebase -i --autosquash a0b1c2d3~1 # Now merge fixup commit into broken commit
fixup 和 squash 很像,但是不会弹出编辑器要求你提供 commit message。
git commit --fixup 的作用是让这次的提交信息变成 “fixup! " 加上要 fixup 的那条 commit 的日志,这样使用 git rebase -i --autosquash 的时候工具就能把它放在一个正确的位置,理论上比手动编辑 commit 更方便。然而,你需要知道要 fixup 的 commit,也就是说要粘贴两次(commit 一次,rebase 一次),而且 --autosquash 这个选项还挺长的。感觉还是 vim dd + p 比较方便。
git rebase 发生冲突怎么办
The first is how you complete the conflict resolution. Rather than
git commitlike you’ll use when addressing conflicts that arise fromgit merge, the appropriate command for rebasing isgit rebase --continue.
同样会在文件中留下 markers,解决冲突之后要用 git rebase –continue 而不是 git merge。
If you want to take a look at the diff of the commit that Git failed to replay, and which resulted in a merge conflict, you can use
git rebase --show-current-patch, or its equivalentgit show REBASE_HEAD.
Finally, it’s worth noting that when using
git checkout --oursor--theirsto quickly resolve conflicted paths by checking out a specific version from the index, the meaning of those options is reversed compared to a regulargit mergemerge conflict: during rebase,--theirsrefers to the changes from the branch being rebased (REBASE_HEAD), and--oursrefers to the changes from the branch onto which we are rebasing (HEAD). https://git-rebase.io/#note-6
git reset
The reset command overwrites these three trees in a specific order, stopping when you tell it to:
- Move the branch HEAD points to (stop here if
--soft).- Make the index look like HEAD (stop here unless
--hard).- Make the working directory look like the index.
只 reset 部分文件
git reset file.txt 相当于 git reset --mixed HEAD file.txt。由于 HEAD 只是一个指针,不能同时指向不同的地方,git reset 文件的时候是不会移动 HEAD 的。那这一步的效果就是从 HEAD 中取出文件快照还原到 index 区,相当于 git restore --staged file.txt。
只 reset 部分文件的时候,好像只能是 –mixed 模式。
用 reset 来做 squashing
首先是 git reset –soft {commit} 定位到之前的位置,然后直接 git commit。因为 git reset –soft {commit} 不会改动 index 和工作区!
git checkout
git checkout {commit} 表面上有点像 git reset --hard {commit},但是:
- git checkout 在修改文件之前会做检查,只会将未修改过的文件更新。
- git checkout 只会简单修改 HEAD,因而能在不同的分支之间跳转。git reset –hard 会把当前分支的 HEAD 改成给定的 commit 并移动过去!
git checkout -- {files...} 相当于 git reset -- {files...}(只修改 index)之后又将相关文件在 index 的内容复制到工作区。
要找只修改工作区文件而不修改 index 的单个命令就只有 git restore 能做到。
git merge
git merge 可以使用 -Xignore-all-space 或者 -Xignore-space-change 参数。后者将多个空白字符视作一个,但是将有空白字符和无空白字符视作差异。