CUDA 调试
cuda-gdb 是 cuda 的调试工具,执行非常慢。
如果需要符号信息,nvcc 的编译选项需要加上 -g -G,其中 -g 是给 host 代码添加符号信息,而 -G 是给 device 侧代码添加符号信息。
cuda-gdb 是 cuda 的调试工具,执行非常慢。
如果需要符号信息,nvcc 的编译选项需要加上 -g -G,其中 -g 是给 host 代码添加符号信息,而 -G 是给 device 侧代码添加符号信息。
提示 XHR failed。
找到插件的网页下载 Linux 版本,然后从文件资源管理器拖动文件到工作目录,拷贝文件后运行:
code --install-extension ./doxdocgen-1.4.0.vsix
也可能是本机的代理设置和远程主机的代理设置冲突了,可以修改远程主机的 "http.proxy" 为空:
{
    "http.proxy": "",
}
& 属性
被 decltype 坑了很多次。推导出来可能有引用类型,想要值类型时需要先去掉!
std::visit 的多个参数必须独立和模板参数匹配(或者 lambda 和 C++20 函数的 auto),所以即便是要求两个类型相等,也必须写成这样:
template <typename DType1, typename DType2>
void f(DType1* input, DType2* output) {
  // DType1 and DType2 are actually the same type.
}
如果确定两个类型一样,也可以少传入一个 variant,使用 void * 传入类型,然后手动做转换。
if constexpr 只在模板代码中才有去除分支的作用,在普通代码中是不行的,此时不能用来剔除不能编译的分支。
curl -s -L https://nvidia.github.io/nvidia-docker/gpgkey | sudo apt-key add -
distribution=$(. /etc/os-release; echo $ID$VERSION_ID)
# 如果 debian12 不支持可以改成 debian11
curl -s -L nvidia.github.io/nvidia-docker/$distribution/nvidia-docker.list | sudo tee /etc/apt/sources.list.d/nvidia-docker.list
sudo apt-get update
sudo apt install -y nvidia-docker2
# 必须重启 docker
sudo systemctl restart docker
注意,这个类作为(不完整)类型出现在别的模板的参数中是可以的,只有访问成员才会出错。
template <typename Target>
struct FindValue<Target, TypeList<>> {
  static inline constexpr bool ALWAYS_FALSE = sizeof(Target) == 0;
  static_assert(ALWAYS_FALSE, "Unsupported type! Check `proj::detail::DataTypeList`.");
};
https://stackoverflow.com/a/40472836/
任何类型要么是不完整类型,无法被 sizeof 评估(会报错),要么被评估为正整数(包括 void 也会被评估为 1)。用 -1 的话会有类型转换警告,所以用 0 就好了。
模式有三种:
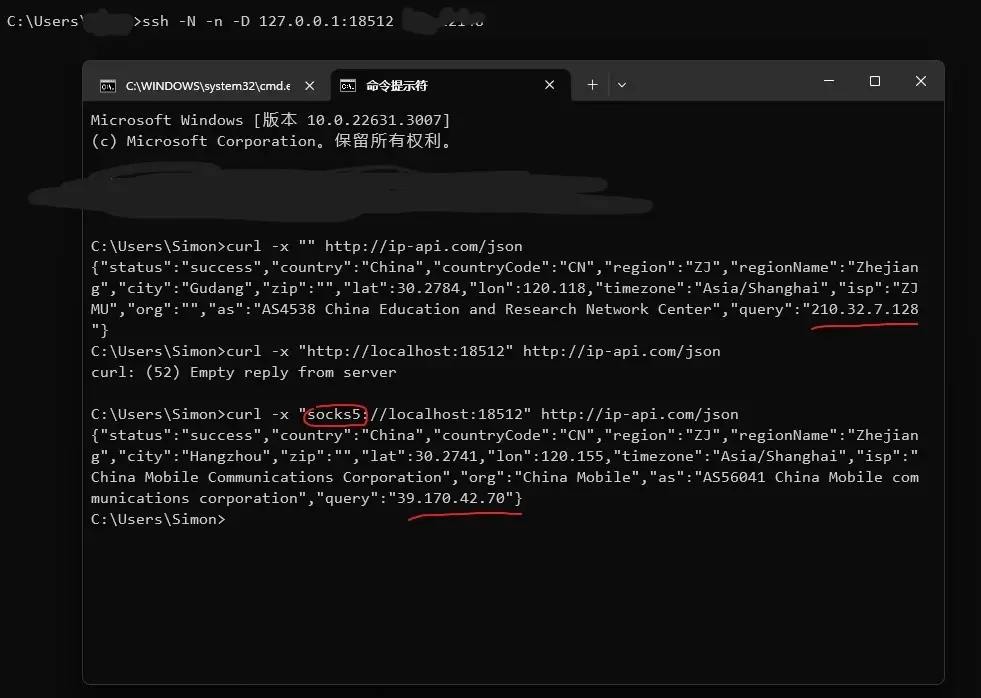
-L 将本地端口映射到远程(将客户端请求转给远程服务器)-R 将远程端口映射到本地(客户端和远程服务器抢请求)-D 动态代理,生成一个 socks 代理,支持 socks(4)/socks5 协议-R 代理
服务器连不上外网的时候常用这个。见 ssh 代理转发,让服务器上外网
-D 代理
生成一个 socks 代理。如图,我创建代理之后,本地用这个代理去访问网站,实际上是远程服务器代我访问了网站。
首先是 google 上能够搜到的所有答案。
如果用 dig axfr 搜不到,说明域名服务器没开 axfr,或者子域名不在同一个 zone。简单来说,axfr 是一个允许 client 下载整个 zone 信息的协议。
如果网站允许搜索引擎爬取,则可以用 google 的网站过滤来搜索,比如 site:xx.yy。
以文件 .vscode/c_cpp_properties.json 中 configuration 的 configurationProvider 的值来分类。
缺点:文件不在编译数据库中时 include 路径不正确(对新文件不友好)。
configurationProvider 是 ms-vscode.cmake-tools 时,compileCommands 和 includePath 设置是无效的。这个时候如果 compile_commands.json (编译数据库)中没有这个文件(尤其是 CMakeLists.txt 中可能尚未加入新编写的文件的情况),或者编译数据库尚未配置(需要先编译生成一次),include 路径就不正确。

[10/26/2023, 7:45:25 PM] "xxxx.cc" not found in "${workspaceFolder}/build/compile_commands.json". 'includePath' from c_cpp_properties.json in folder 'proj' will be used for this file instead.s
apt install nodejs
apt install npm
# 校内可用
npm config set registry xxx
npm install --global http-server
http-server
默认的 serve 路径是 ./public,如果找不到则使用 . 这个路径。
top -H 显示人类能阅读的大小。
进入 top 之后:
其实不是一定要按 shift,只要输入大写字母即可(比如用 CapsLk)